Grow Clockinator Pro With Purpose-Built Addons
The Clockinator Pro → Addons panel is the central place to review optional expansion paths for reporting, time tracking, AI, workflow automation, frontend self-service, billing, attendance devices, integrations, and field workforce operations
How the Addons Panel Works
The Addons page is designed as an expansion catalog rather than a settings screen for the core Clockinator Pro features. Each addon card communicates four things: the addon category, its current activation state, a short description, and a concise list of the capabilities it is intended to add.
- Open the panel: Go to WordPress Dashboard → Clockinator Pro → Addons.
- Review availability: Browse the addon cards and read the feature tags and description.
- Check status: The Not Active badge indicates that the addon is not currently active in the captured installation.
- Open the addon/sales path: Depending on the card, use Explore BeastThemes, View Addon, or View Demo to continue.
- Activate/configure: After an addon is obtained and activated, use the addon-specific documentation and any new menus/settings it introduces.
Live Addons Panel Screenshots
The following images are the actual screenshots supplied for this documentation. They are used instead of placeholders so customers can recognize the Addons page immediately.

What this screenshot shows
- Page heading: “Grow Clockinator Pro With Purpose-Built Addons” introduces the page as an expansion catalog.
- Summary counters: The screen reports 11 sales-ready addon showcases and 0 addons active on the site.
- Addon cards: The first row presents Advanced Reports & Analytics, Smart Time Tracking, and AI Copilot.
- Feature tags: Tags such as “Analytics reports”, “Live timer”, and “AI insights engine” provide a quick visual summary before opening an addon.
- Status badge: Each card currently shows Not Active, so these addons are not enabled in the captured environment.
- Action buttons: The cards provide a route to explore the addon or contact sales; these are discovery/purchase actions rather than proof that the addon is installed.

What this screenshot shows
- Process Automation & Approval Engine: Positioned around workflow automation, role-based approvals, escalation tracking, and request operations.
- Frontend Dashboard: Focuses on an employee-facing workspace for attendance, leave, profile, and self-service operations outside wp-admin.
- Frontend Builder: Focuses on custom frontend attendance pages, workforce widgets, and branded self-service sections.
- Different card actions: This screenshot shows that an addon can expose View Addon and View Demo actions in addition to the general BeastThemes/sales route.
- Customer takeaway: These addons are aimed at organizations that need more automation or a more customized employee-facing experience than the core admin workflow provides.

What this screenshot shows
- Invoicing & Client Billing: The card highlights invoice lifecycle, payment plans, statements, credits, client billing metadata, taxes, recurring invoices, and payment tracking.
- Kiosk / QR Attendance: The card highlights QR card scanning, kiosk attendance, door-access API, employee QR cards, and device/control workflows.
- Biometric Attendance: The card highlights fingerprint/facial/iris concepts, device enrollment, and webhook support for hardware devices.
- Not Active state: All three cards are shown as inactive in the supplied screenshot, so the captured site is not demonstrating these addons as enabled.
- Use this section to choose an expansion: Customers can quickly identify whether their requirement is billing-related or attendance-device-related before moving to the addon's dedicated information or sales path.
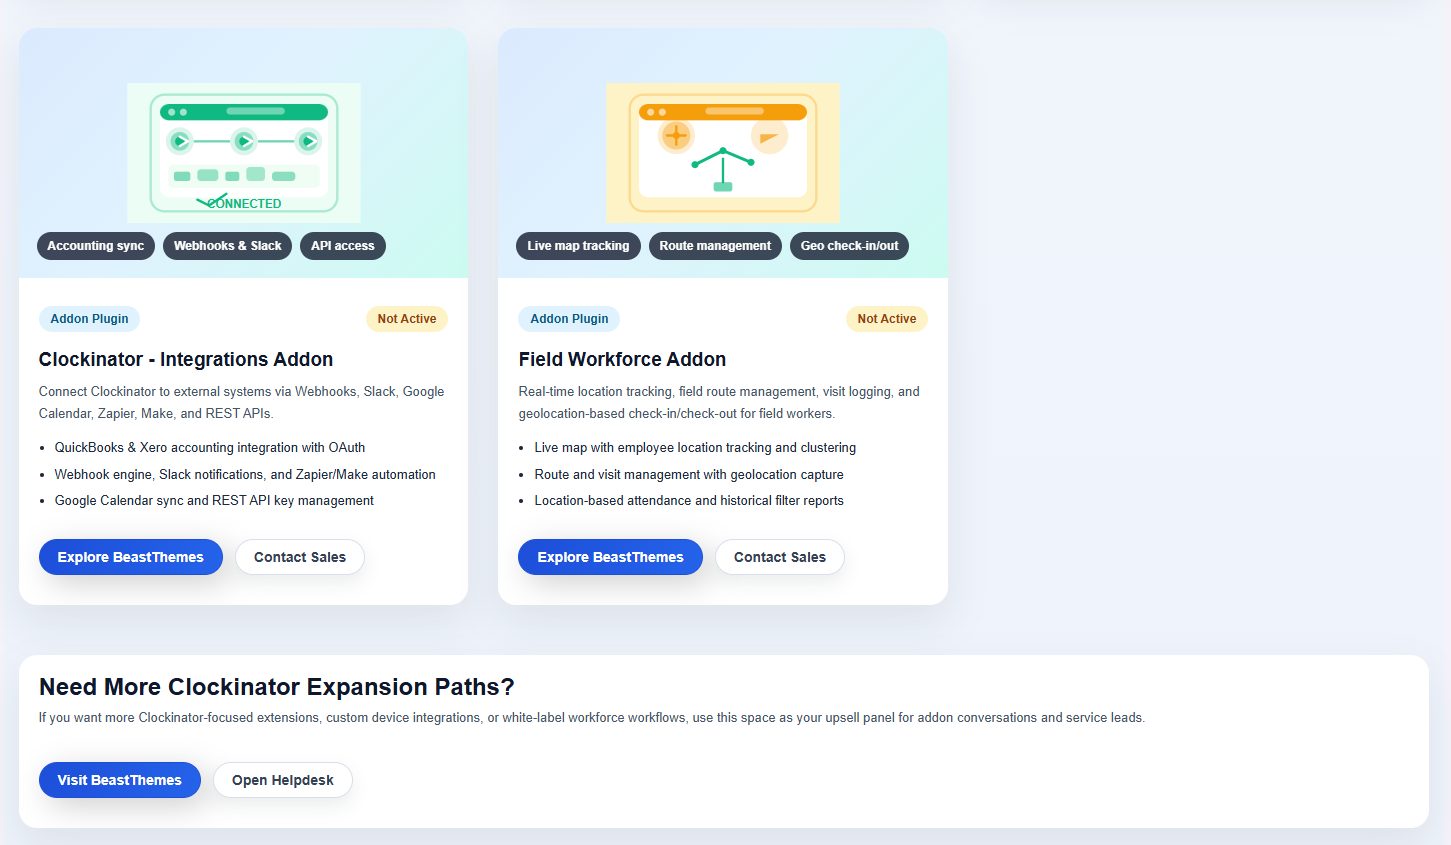
What this screenshot shows
- Clockinator – Integrations: The card presents external-system connectivity through webhooks, Slack, Google Calendar, Zapier, Make, REST APIs, and accounting integrations.
- Field Workforce: The card presents location-aware workforce operations such as live map tracking, route management, visit logging, and geo check-in/out.
- Expansion CTA: The bottom section asks whether the customer needs more Clockinator expansion paths and provides links for BeastThemes and the Helpdesk.
- Customer guidance: If the requirement involves external services, field employees, custom devices, or white-label workflows, this section points toward the relevant addon path or support/sales conversation.
Installing an Addon in WordPress
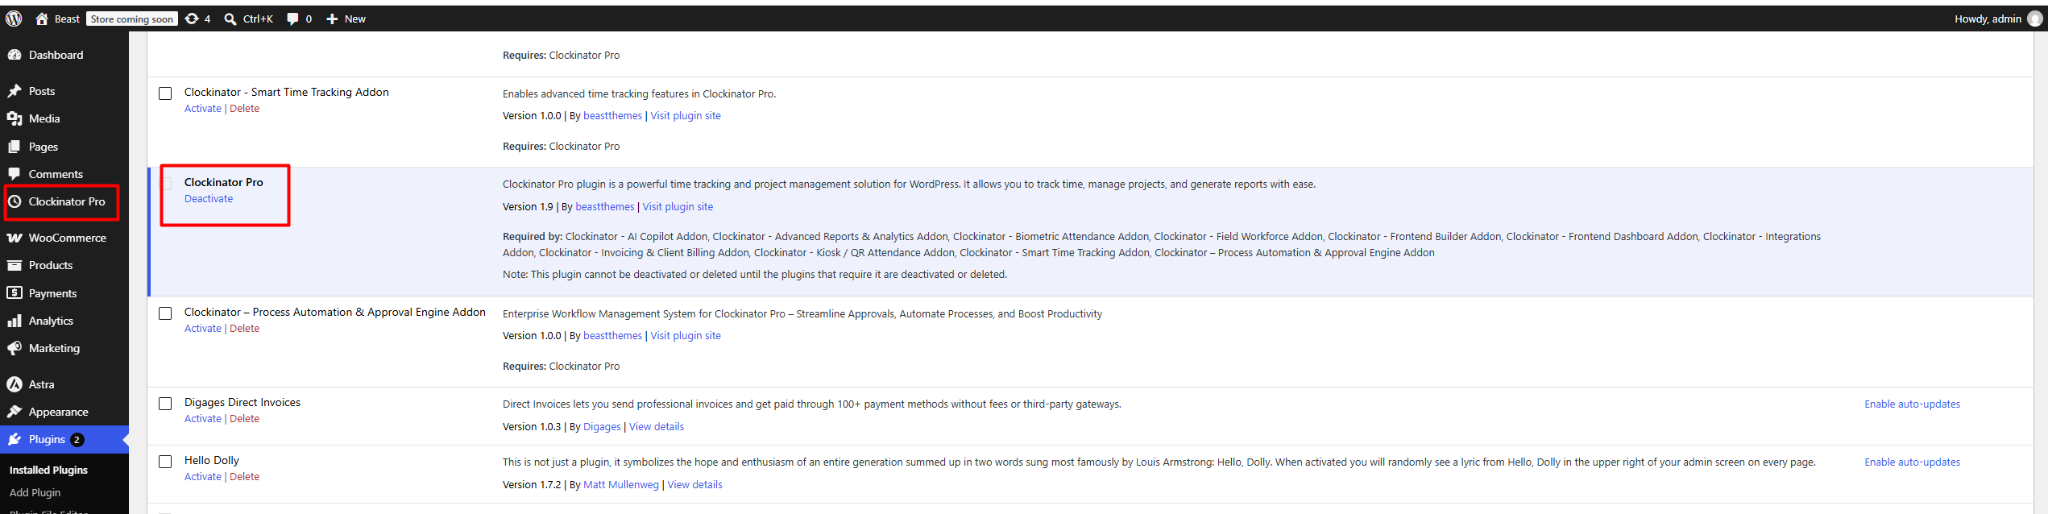
The Addons catalog explains what each expansion provides. When you receive an addon as a ZIP package, WordPress installs it through the same plugin upload workflow used for Clockinator Pro. The live screenshot below shows Clockinator Pro active alongside installed Clockinator addons.
How to interpret the addon installation screen
- Clockinator Pro: The core plugin is active and supplies the base functionality required by the listed addons.
- Requires: Clockinator Pro: The addon rows explicitly identify the core plugin as a dependency.
- Activate: A newly installed addon must be activated before its functionality is available.
- Dependency protection: WordPress notes that Clockinator Pro cannot be deactivated or deleted while dependent addons remain active.
Clockinator Addons in the WordPress Plugins Screen
After an addon ZIP has been installed, WordPress lists it under Plugins → Installed Plugins. This screen is especially useful for confirming that an addon was installed successfully, checking whether it is active, and verifying that it requires the Clockinator Pro core plugin.

How to read this screenshot
- Plugins page: The screenshot is the standard WordPress Plugins screen, where installed plugins are managed.
- Clockinator Pro core plugin: The Clockinator Pro row is shown as active, with the Deactivate action. This confirms that the core plugin is enabled.
- Clockinator addon rows: Several Clockinator addons are installed and currently show Activate | Delete. The Activate link means the addon is installed but not currently active.
- Requires: Clockinator Pro: The addon descriptions explicitly show this dependency. Keep the core Clockinator Pro plugin active when using these addons.
- Addon versions: WordPress displays the installed addon version in each row, making this screen useful when checking what release is currently installed.
- Visit plugin site: The addon rows can include a link to the plugin site, providing a route to additional product information.
- Do not confuse installed with active: An addon can appear in the Installed Plugins list while still being inactive. Customers must click Activate before expecting the addon's functionality to become available.
Clockinator Addons Visible in the Supplied Plugin List
| Plugin shown | What the screen indicates | Dependency |
|---|---|---|
| Clockinator - Advanced Reports & Analytics Addon | Installed; Activate/Delete actions are available in the screenshot. | Requires Clockinator Pro |
| Clockinator - AI Copilot Addon | Installed; Activate/Delete actions are available in the screenshot. | Requires Clockinator Pro |
| Clockinator - Biometric Attendance Addon | Installed; Activate/Delete actions are available in the screenshot. | Requires Clockinator Pro |
| Clockinator - Field Workforce Addon | Installed; Activate/Delete actions are available in the screenshot. | Requires Clockinator Pro |
| Clockinator - Frontend Builder Addon | Installed; Activate/Delete actions are available in the screenshot. | Requires Clockinator Pro |
| Clockinator - Frontend Dashboard Addon | Installed; Activate/Delete actions are available in the screenshot. | Requires Clockinator Pro |
How to Activate an Installed Addon
- Open WordPress Dashboard → Plugins → Installed Plugins.
- Locate the Clockinator addon you want to use.
- Confirm that Requires: Clockinator Pro is satisfied and that Clockinator Pro itself is active.
- Click Activate under the addon name.
- Return to the Clockinator Pro admin area and check whether the addon introduces a new menu, settings section, dashboard option, or workflow.
- Follow the addon-specific documentation to complete configuration.
Available Addons Shown in the Live Panel
The following descriptions are based on the addon cards and feature bullets visible in the supplied screenshots. They are intended to help customers understand why they might choose an addon. Detailed addon-specific settings should be documented separately once that addon is installed and its own UI is available.
1. Advanced Reports & Analytics Addon
Designed for deeper attendance, leave, payroll, and productivity analytics.
- Attendance, leave, and productivity reports with filters.
- Visual charts and responsive DataTables.
- CSV and XLSX export.
Best for: Organizations that need richer reporting, visual analysis, and exportable management data.
2. Smart Time Tracking Addon
Designed around a tracker-focused workflow for daily attendance and work-session management.
- Start, pause, resume, and stop work sessions in one tracker UI.
- Manual entries with optional project and task mapping.
- Recent logs and timesheet-ready tracking output.
Best for: Teams that want more active time-tracking controls and manual time-entry workflows.
3. AI Copilot Addon
Designed to add AI-driven workforce intelligence around attendance, leave, payroll, forecasting, and operational questions.
- Actionable insights across attendance, leave, payroll, and forecasting modules.
- AI assistant functionality with project and task context.
- Provider controls for OpenAI, Anthropic, Gemini, and Ollama as shown in the panel.
Best for: Organizations looking for AI-assisted analysis and operational assistance.
4. Process Automation & Approval Engine Addon
Designed to automate leave and attendance approval workflows with role-based routing and escalation.
- Workflow builder with multi-step approver routing.
- Request operations for leave and attendance correction flows.
- Notification queue, activity logs, and escalation history.
Best for: Organizations with multi-level approvals or formal HR/attendance processes.
5. Frontend Dashboard Addon
Provides a dedicated frontend workspace for employees so self-service activities can be presented outside the WordPress administration area.
- Employee-facing attendance and leave dashboard.
- Reduced backend access for non-admin staff.
- Cleaner self-service UX for demos and customer deployments.
Best for: Businesses that want employees to use a branded frontend workspace instead of wp-admin.
6. Frontend Builder Addon
Designed for creating custom frontend attendance pages, employee widgets, and branded self-service sections.
- Create custom frontend pages for attendance and workforce actions.
- Assemble sections and widgets for role-based user experiences.
- Deliver branded frontend workflows without exposing wp-admin.
Best for: Agencies and businesses that need a customized employee portal or branded frontend experience.
7. Invoicing & Client Billing Addon
Designed to extend time/workforce management into customer billing and invoice workflows.
- Invoice generation, lifecycle actions, and payment tracking.
- Client billing metadata, tax rules, and recurring schedules.
- Credit notes, refunds, payment plans, and statement exports.
Best for: Agencies, service businesses, and teams that need to turn client/project activity into billing workflows.
8. Kiosk / QR Attendance Addon
Designed for QR-based attendance and kiosk-style clock-in/out workflows.
- Print and scan employee QR attendance cards.
- Frontend kiosk screens for clock-in/out.
- API logs, device control, and door-unlock rules.
Best for: Offices and locations that want a shared kiosk or QR-driven attendance station.
9. Biometric Attendance Addon
Designed to connect biometric attendance workflows with Clockinator Pro.
- Fingerprint, facial, and iris-oriented attendance workflows as presented in the panel.
- Register biometric devices by location.
- Store employee enrollments with device links and support webhook-based hardware integration.
Best for: Organizations using supported biometric hardware and device-triggered attendance.
10. Clockinator - Integrations Addon
Designed to connect Clockinator Pro with external services and automation platforms.
- QuickBooks and Xero accounting integration with OAuth, as shown in the panel.
- Webhook and Slack notifications, plus Zapier/Make automation.
- Google Calendar synchronization and REST API key management.
Best for: Businesses that need Clockinator data to move between accounting, calendars, messaging, and automation systems.
11. Field Workforce Addon
Designed for employees who work outside a fixed office and need location-aware attendance and field operations.
- Live map with employee location tracking and clustering.
- Route and visit management with geolocation capture.
- Location-based attendance and historical filter reports.
Best for: Field-service teams, mobile workers, sales teams, technicians, and other distributed workforces.
Which Addon Should I Choose?
| Requirement | Recommended addon | Main reason |
|---|---|---|
| Advanced charts, analytics, CSV/XLSX reports | Advanced Reports & Analytics | Extends reporting and data analysis. |
| Live tracker and manual time entries | Smart Time Tracking | Adds tracker-focused work-session controls. |
| AI insights and assistant workflows | AI Copilot | Adds AI-oriented workforce intelligence. |
| Multi-step approvals and escalation | Process Automation & Approval Engine | Automates approval routing and escalation. |
| Employee self-service outside wp-admin | Frontend Dashboard | Provides a dedicated frontend workspace. |
| Custom branded frontend pages/widgets | Frontend Builder | Focuses on custom frontend layouts and widgets. |
| Client invoicing and billing | Invoicing & Client Billing | Extends the system into billing workflows. |
| QR cards and kiosk attendance | Kiosk / QR Attendance | Provides QR/kiosk-oriented attendance flows. |
| Biometric hardware attendance | Biometric Attendance | Targets biometric device enrollment and webhooks. |
| Accounting, calendar, Slack, Zapier/Make connectivity | Clockinator - Integrations | Connects Clockinator with external systems. |
| Mobile/field employee tracking | Field Workforce | Adds location-aware field operations. |
Before Activating an Addon
- Identify the business requirement. Start with the problem you want the addon to solve rather than installing every addon.
- Check your Clockinator Pro version. Use the addon documentation/product information for the version you are running.
- Check licensing. Some addon actions in the panel are clearly positioned as sales/exploration actions. Obtain the appropriate addon before expecting its features to become available.
- Install and activate the addon. Follow the addon-specific installation instructions supplied with that addon.
- Return to Clockinator Pro. Check whether a new menu, settings section, widget, or workflow is now available.
- Configure the addon before testing. Complete any required provider, device, role, location, or API configuration.
- Run a controlled test. Test the addon with a small set of employees/data before rolling it out across the organization.
Understanding “Not Active”
The yellow Not Active badge shown on the supplied screenshots indicates the addon is not active in the captured site. It should not be interpreted as a problem with the Clockinator Pro core plugin.
- Core plugin active: Clockinator Pro can continue providing its core functionality.
- Addon not active: The additional functionality represented by that addon is not enabled in this installation.
- Addon active: After installation/activation, the addon may expose its own menus, settings, widgets, workflows, or integrations depending on its design.
Need More Clockinator Expansion Paths?
The live panel includes a dedicated expansion callout for customers who need additional Clockinator-focused extensions, custom device integrations, or white-label workforce workflows. Use the available BeastThemes or Helpdesk route shown on the page when your requirement does not fit one of the listed addon cards.